Do it Yourself
The first bit of advice we give to anyone wanting to replace or repair the screen of their laptop is to work methodically and with patience. For those that do this on a regular basis, it is a fairly easy and quick process. You first need to have a clean and well-lit work space.
If you are not comfortable taking your device apart or replacing the screen, you should find an ASUS certified professional repair service
1. Assess the problem or damage
- Does your PC work properly?
Does your laptop power up successfully? We recommend that you hook your laptop up to an external monitor. You may need to go to "Settings" or use some function keys for the external display to be recognized. If the external monitor works properly then you can infer that the issue is with your laptop screen assembly or the EDP/LVDS cable.
Inspect the Laptop
Once you have determined that it is not another component such as the graphic card or a software issue, you should inspect the physical damage (if any). Is the frame around the screen (bezel) damaged, is the screen itself damaged, is there an impact point. If the Bezel was damaged you will have to purchase a new Bezel. Please note that sometimes these are only sold as part of the complete screen module. You should verify that the hinges are intact and well secured as well. The cables connecting the LCD to the motherboard run through the hinges.
2. Find the Correct Screen
This is the easy part for your ASUS laptop. Locate the serial number of your laptop and contact us here. We will link you to the correct screen for your laptop.
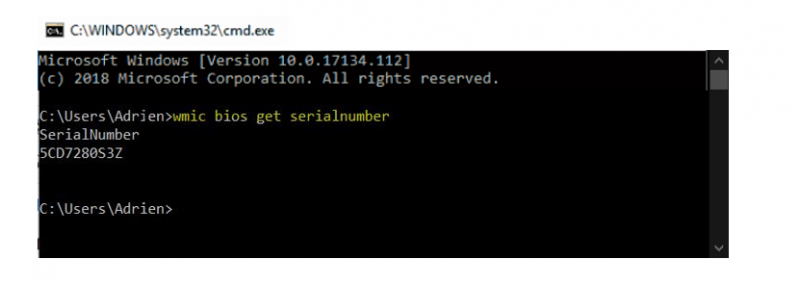
You can retrieve the serial number from the BIOS : in Windows open the "command" prompt
- Go to start menu and In search box type: CMD
- At the prompt (shown below as C:UsersOwner>) type exactly : wmic bios get serialnumber
- Then press enter and the serial number will be revealed
- You can also retrieve it by following the simple steps of this article
3. Get the Right Tools and Open the Screen
You will need a few tools in order to properly install your new laptop screen.
- A clean, flat surface where you can work
- A putty knife or similar object to remove the screen bezel
- Appropriate screwdrivers
- A wedge for removing the bezel
- A small dish to hold screws
Steps to replace an Asus Laptop Screen
Remove the Power Sources
To replace your screen, first turn off your Asus laptop and make sure that it is unplugged from a power source. You should, also, remove the battery to avoid causing any other issues. Remember, avoid touching any components without being grounded…static electricity can damage your components!
The screen bezel may have some screw covers usually near the bottom of your laptop screen near the hinges.
Carefully Remove Stickers and Screws
Carefully remove the screw covers using a pin or the wedge in the kit shown in the link above. Store these to use when installing your new screen.
You’ll then want to use the proper screwdriver to remove the screws. Do not apply excessive pressure when removing the screws. Store the screws safely. If you lose some screws you can find the screws for your specific laptop with this link.
Remove the Bezel
Remove the Bezel using the wedge or a putty knife. Take your time. You do not want to damage the Bezel or have to purchase a new one. The wedge is used to pry the bezel from the LCD cover. There are plastic tabs at regular intervals that hold the screen and bezel in place. You will need to apply enough pressure to pull them apart. Click here if you need to replace your Bezel.
If you damage the bezel, click here if you need help finding the serial number of your laptop
Remove the LCD Screen
Now you should have unfettered access to the LCD screen. It will be secured onto the laptop’s metal frame. There will be two screws at the top corners. You may find a few more screws securing the LCD on the sides and in some cases a heavy-duty tape holding the LCD in place. You will have to remove these. Place the screws in a different dish (label the dish). If you had to remove any adhesive, you will need to replace with new adhesive to install the new screen properly.
Disconnect the Cable Connectors
Be careful, your screen is still connected to the bottom case by the EDP/LVDS cable. You will need to disconnect the cable. If there is any adhesive tape, remove it before pulling the connectors apart.
Apply straight even pressure when pulling. Do not twist.
Insert the New Screen
Now you will be re-assembling. Simply follow the steps above in reverse order. Place the new screen flat and connect the EDP/LVDS cable. Please ensure that the connectors are properly aligned. Attach the new screen with the proper screws and adhesive to hold the LCD in place.
Reattach the Bezel
Put the bezel back on. Line it up so that it snaps properly into the screen case. Make sure the Bezel is nice and snug. Replace the two screws and screw covers.
Power Up the Laptop
Put the battery in, connect your Laptop, and turn it on.
Update your BIOS and Driver
It is always recommended that you update the BIOS and drivers after installing new equipment to make it run properly. Congratulations you have replaced your Asus laptop screen by yourself.
Need Any Help?
We are here to help you find the Asus parts you need to successfully repair your laptop. You can contact us with this link if you need any help.